vZTL - Atlanta Center - Lesson 2
This session is estimated to take roughly 90 minutes. Times may vary based on theory and other shit.
STANDARDS TO ACHIEVE / Introduction to En-Route: The first standard listed requires the student to explain the role of an en-route controller with a reference to Chapter 5 - Radar in the 7110.65. Unfortunately, this is a rather vague reference, by necessity, as there aren't any really great sources for what constitutes a en-route facility. Chapter 5 is the source for all information specific to “RADAR procedures”. The other part that introduces additional complexity to this question is that, in many cases, there is not only “one” center controller working a particular position. Many times, to reduce complexity and increase the number of eyes watching a problem, a particular sector may operate with a team of controllers, each with different responsibilities.
The second standard listed provides that the student identify and ensure en-route separation. The ensuring of separation is, obviously, reliant on the identification of the separation requirements. These are outlined in 5-5-4, with a bunch of other bullshit, so let's take a gander at what the good book says, shant we?
- Below FL600 - 5 miles
- At or above FL600 - 10 miles
- Up to & including FL230, when involved aircraft are displayed using the 3 mile target (target in the red box below)
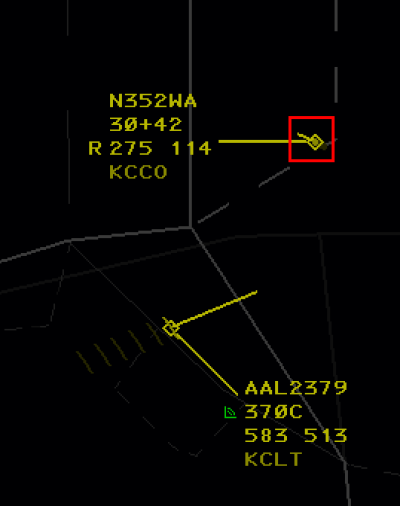
- WHEN TRANSITIONING FROM THE TERMINAL ENVIRONMENT - 3 miles, INCREASING to 5 MILES before leaving the first center sector & provided by LOA
- Additionally, lead aircraft is & will remain faster than the following aircraft, and/or, aircraft are on diverging routes

-
- Up to & including FL410 - 1000 feet
- When non-RVSM aircraft are operating between FL290 and FL410, apply 2000 feet between them and all other aircraft.
- Above FL410 - 2000 feet
- Above FL600 between military aircraft - 5000 feet
- Wake Turbulence application -
- Behind Super - 5 miles, except when the Super is:
- AOB FL240 & below 250 knots - Heavy / 6 miles
- AOB FL240 & below 250 knots - Large / 7 miles
- AOB FL240 & below 250 knots - Small / 8 miles
- Behind heavy:
- Heavy / 4 miles
- Large / Small - 5 miles
Additionally, we need to keep aircraft at least 2.5 miles away from airspace boundaries (our 2.5 and the other controller's 2.5 add up to meet 5 miles of separation between any airplanes that may be over there).
The third standard listed requires that the student ensure positive separation is maintained. In other words, only one aircraft may be “delegated” a particular chunk of airspace at a time & you must protect for that. You have to assume that when you issue an instruction, the aircraft will climb like a rocketship or descend like a rock. There are certain exceptions to this rule, such as "altitude leaving", wherein you may issue an altitude that was vacated by another aircraft before 1,000 feet of separation exists.
For example, in the image below, COOK72 was at 17,000, but is now descending to reach 11,000. As soon as the datablock indicates that COOK72 has left 17,000, we can descend other aircraft to 17,000 wherever COOK72 may be, even though they may not have 1,000 feet of separation. This is covered in 5-5-5. VERTICAL APPLICATION, subpara b, note 2.

The fourth standard listed requires that the student transfer communication in a timely manner using prescribed phraseology. Ensure the aircraft is talking to the correct controller before entering their sector.
STANDARDS TO ACHIEVE / Altitude Changes: The fifth standard listed requires the student demonstrate an understanding of basic descent math. Start by figuring out the “altitude to lose”.

The aircraft in the example above is at FL390, but needs to cross the border at FL240. We want the answer in thousands of how many feet we need to lose.
39 - 24 = 15
The aircraft needs to lose 15,000 feet, and we're going to shorten that to 15. Now, multiply that value by 3 to get the number of miles…
15 x 3 = 45
We want to issue the instruction at least 45 miles out from where the restriction is. Add a few miles (I prefer 10, so 45 + 10 = 55) for a good buffer. So when its all said and done, we should issue the descent at least 55 miles away from their restriction.
OBJECTIVES TO ACHIEVE:
1. Vectored and/or issued speed instructions to aircraft to meet Miles-In-Trail (MIT) requirements.
The primary goal of this lesson is to meet an established Miles in Trail (MIT) requirement. MIT is one type Traffic Management Initiative (TMI), which are programs designed to reduce the rate of aircraft travelling to, or through, a constrained area/point (such as an airport or sector of airspace).
So how do I use speeds to generate miles between aircraft?
Conventional wisdom (i.e. what you were taught during your S3 days) was something to the effect of “vectors to gain, speeds to maintain” - which still holds true when trying to build miles between aircraft within a particular constraint of short distances/time. However, in the center environment, we can usually spot problems a lot earlier and with a lot later of a “due date”, if you will - this means that we can issue speeds and use the difference in ground speeds to gain miles. Before we do that, we need to review the .65's rules on speed requirements. In short, the .65 mentions:
- Speed adjustments are NOT achieved instantaneously, based on aircraft configuration (flaps/gear), altitude (higher altitude → slower to increase speeds), and the speed already being flown when the instruction is issued.
- When issuing speed adjustments to aircraft that are in line, we want to counteract the effects of compression, by:
- Increasing the speed on leading aircraft before speeding up the airplanes behind, and
- Reducing the speed on trailing aircraft before slowing earlier aircraft in the sequence
- Ensure aircraft are allowed to operate in a clean configuration as long as circumstances permit (i.e. try not to force aircraft to drop flaps to meet your restrictions)
- Keep adjustments to aircraft speeds minimal, when possible. It's annoying, otherwise.
- Do not assign speeds to aircraft that are:
- At or above FL390 *without pilot consent*, which is obtained by issuing the speed, and tacking on “if unable, advise”, at the very end.
- Executing a published high altitude instrument approach
- Flying a holding pattern
- Climb/Descend via clearances will delete previously assigned speeds, and may result in the application of SID/STAR published speeds
- Let aircraft know when to expect to resume published speeds, when possible, if you plan on reinstating them down the line.
Issue speeds in terms of knots in 5-knot increments. At or above FL240, you may, but are not required to, issue Mach numbers. These are issued in 0.01 increments. When you assign a speed, aircraft are expected to remain within +/-10 knots or 0.02 Mach number of the assigned speed. Do your best to not issue a speed below 250 knots (or equivalent Mach number) to aircraft above 10,000, except when operationally necessary.
When issuing Mach numbers, consider the following:
- 0.01 Mach should translate to around 6 knots
- Mach numbers indicate the aircraft's speed in relation to the speed of sound. The speed of sound is much higher near the surface of the earth than it is higher up in the atmosphere. So, if you assign DAL123 at FL280 M.77 and AAL456 at FL340 M.77, DAL123 will have a (sometimes significantly) higher ground speed than AAL456.
- You cannot issue Mach numbers below FL240, so, if you have someone on an assigned Mach number, and you have a particular speed you want them to do below FL240, instruct the aircraft to “transition to XXX knots”, or, “in the transition, maintain XXX knots”.
- When starting to set up a sequence, feel free to issue “maintain maximum forward speed” and “maintain slowest practical speed”. Eventually, you may want to assign specific speeds to these aircraft.
Everything is math; and as such, you can use math to make a science out of speed issuance. I do not care to do the math, though, so I prefer to issue speeds, feel it out, and make adjustments as necessary. ERAM has nice tools that you can use to assist you in these endeavors.
 LA / Left click / Middle Click - Give you the distance between two points. If the first click was an aircraft, it will display the time to the second point.
 LB / Left click <target> / TYPE <fix name> / Enter - Like LA, but you don't have to click on the fix.
 LC / Left click <target> / TYPE <fix name> SLASH TIME ENTER - Like LB, but will spit out a wanted ground speed to have the aircraft hit the fix at the specified time.
 LF - We'll go into more depth in a moment...
Let's look at some examples:
LA △ △ <enter>
 RANGE → 13.8 NM between the two click points
BEARING → 213 from click one to click two
FROM the first TrackBall location,
If you left clicked on an aircraft, AT 123 KTS (travel speed), 6 MIN (till the aircraft reaches AWSON)
LB △ AWSON <enter>
 RANGE → 12.3 NM from AWSON
BEARING → 213 from click to AWSON
FROM TrackBall to FIX AWSON
If you left clicked on an aircraft, AT 123 KTS (travel speed), 6 MIN (till the aircraft reaches AWSON)
1 “minute” of difference in two aircraft reaching a point typically translates to about 5 miles between aircraft. Typically is the key word.
–
If you don't want to use speeds to build miles (or can't because you don't have the time to let the speeds work out), you'll want to vector aircraft off course. Keep in mind that seasonal factors (e.g. winds aloft) may have a significant impact on the aircraft's ground speed. This is most prominently observed when vectoring aircraft that are interacting with the jetstream.
Remember that the jetstream is essentially a river of air in the ocean that is the atmosphere. Let's look at how that can impact our vectoring…

Let's say we need to vector KAL8285 for whatever reason (sequence, flow, metering, etc). Let's consider 3 (of many) choices for vectoring. The yellow PTL is located between the blue arrows 1 & 2. PTL is short for Projected Track Line. I prefer the term stinger, some people will call them bats. The name isn't important - all that matters is that its the current direction the plane is going and where they're expected to be in 1 minute (possible increments are 0,1,2,4,8). Note that the wind is coming from the southwest (typical of this region).
If we turn Korean to the first arrow (a 270 heading), we're expecting a significant decrease in ground speed - even though we didn't issue any speed adjustments! That's because Korean is now swimming up-stream, or flying upwind.
If we turn Korean to the second arrow (a 160ish heading), we're not expecting a major shift in the ground speed, although the speed may increase slightly.
I'm sure you guessed what happens if we turn Korean to the third arrow (a 70 heading), we're expecting a significant increase in the Korean's ground speed.
Many folks will vector airplanes to “build space” and inadvertently shoot themselves in the foot because they aren't taking the impact, sometimes significant, that wind can have on the track/ground speed of the aircraft.
2. Identified and ensured LOA items were followed and met.
Your scope can be quite helpful with this (or it may be a pain in the ass depending on how “complex” the airport is).
The syntax here is rather simple…
.ZXXkYYY, where ZXX is the receiving ARTCC and KYYY is the airport code.

Sometimes it wants more information about the “qualifiers” (Is it a prop? What sector is it going through? Have they paid their taxes?). It's unfortunate(ly annoying) but necessary to try and keep the information more simple.
3. Identified how mach numbers work, and how adjustments affect ground speed.
We discussed this one earlier. Look for the section on 'speeds'
4. Identified the difference between Indicated Airspeed (IAS) and Mach number.
Again, discussed earlier. Additional note, though, is that IAS is the speed of the aircraft relative to the air around it (air density/pressure changes with altitude), and Mach number is the speed of the aircraft in relation to the speed of sound (which, also changes based on the altitude).
5. Calculated how far an aircraft will be in a certain timeframe.
This question is slightly annoying, particularly for me (again, hate math). The folks in charge want you to know it, though, so…
Math. Ugh.
The ground speed in the data-block displays where an aircraft is going to be in 60 minutes (it is ground speed, per hour, after all…)
So our Korean friend from a few screenshots ago is going to travel 442 miles in 60 minutes (assuming no changes to winds aloft, altitude, speed, etc).
This gives us a nice little fraction to use:
442/60
Swap out the numbers and you should be set.
For example, how far is our Korean friend going to travel in 6 minutes at a constant speed of 442 over the ground? (Gotta divide by 10 since 60/10 = 6)
 442    44.2
 --- -> ----
 60      6
Looks like Korean is going 44 miles in 6 minutes. How about in 10 minutes? (Gotta divide by 6 since 60/6 = 10)
 442    73.6
 --- -> ---
 60     10
Looks like Korean is going 73 miles in 6 minutes.
Why is this helpful?
Remember, this part of ATC can be a science, if you want it to be. But making it a science, when workload doesn't allow, can really screw you over.